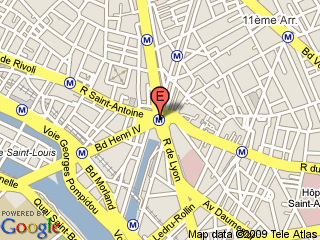
My exploration with JavaFX has been very fruitful. It is really easy to pick up and to be productive with it in a matter of hours. When I started to learn how Google Maps can be used with JavaFX, I found very little useful information in the Web. Googling the keywords "JavaFX Google Maps" was less than satisfactory. Then, I stumbled upon Google Maps can be used statically without Javascript. For example, the following map on Eiffel Tower is displayed using a static html link. Notice the latitude and longitude are specified in the URL.
http://maps.google.com/staticmap?center=48.8531,2.3691&markers=48.8531,2.3691,rede&zoom=14&size=320x240
def stage = Stage {
title : "JavaFX Google Maps Demonstration"
scene: Scene {
 width: 500
 height: 400
 content: [
   ImageView {
     image: Image {
       url: "http://maps.google.com/staticmap?center=48.8531,2.3691&markers=48.8531,2.3691,rede&zoom=12&size=320x240"
     }
   }
 ]
}
}
Next, I discovered the use of Google Geocoding web service. Given an address, you can get the latitude and longitude of that address. For example, to find the latitude and longitude of New York USA, enter the following url.http://maps.google.com/maps/geo?q=NEW+YORK+USA&output=xmlThe Google Geocoding web service will return the following XML. Notice the latitude and longitude of New York, USA are returned in the coordinates element in line 25.
NEW YORK USA 200geocode New York, NY, USA US USA NY New York -73.9869510,40.7560540,0
Hence, using static Google Maps and GeoCoding web service, I ventured to develop this demonstration application using the latest JavaFX 1.2. A screen shot of the application is given here.

This simple application allows the user to enter an address. If Google recognises it, the map of the address will be shown. The user can also pan the map by dragging the mouse or zoom in and out of the map using the slider. The application comprises three files Main.fx, GMapUtils.fx and GmapGeoCoding.fx.
Click on the Launch button to try the application.
The full source codes of these three files are given as follows.
// Main.fx
package jfxgm;

import javafx.stage.Stage;
import javafx.scene.Scene;
import javafx.scene.Cursor;
import javafx.scene.image.ImageView;
import javafx.scene.image.Image;
import javafx.scene.input.MouseEvent;
import javafx.scene.control.TextBox;
import javafx.scene.control.Label;
import javafx.scene.control.Button;
import javafx.scene.control.Slider;

var lng:Number = 103.8476410;
var lat:Number = 1.3717300;
var zoom:Integer = bind javafx.util.Math.round(sZoom.value);

bound function getMapImage(lt, lg, zm):Image {
  var mapurl:String = "http://maps.google.com/staticmap?center={lt},{lg}&markers={lt},{lg},reda&zoom={zm}&size=480x320";
  var map:Image = Image {
    url: mapurl;
  }
return map;
}

function setLatLng(lt:Number, lg:Number):Void {
  lat = lt;
  lng = lg;
}

var mapview:ImageView = ImageView {
  layoutX:10 layoutY:75;
  image: bind getMapImage(lat, lng, zoom);
  cursor : Cursor.MOVE;
  var anchorx:Number;
  var anchory:Number;
  onMousePressed: function( e: MouseEvent ):Void {
    anchorx = e.x;
    anchory = e.y;
  }
  onMouseReleased: function( e: MouseEvent ):Void {
    var diffx = anchorx - e.x;
    var diffy = anchory - e.y;
    lat = GMapUtils.adjustLatByPixels(lat, diffy, zoom);
    lng = GMapUtils.adjustLngByPixels(lng, diffx, zoom);
  }
}

def lblAddress = Label {
  layoutX:10 layoutY:15;
  text: "Address :"
}

def txtAddress = TextBox {
  layoutX:70 layoutY:10;
  text: ""
  columns: 28
  selectOnFocus: true
}

def lblLat = Label {
layoutX:39 layoutY:45;
text: "Lat :"
}
def txtLatitude = TextBox {
layoutX:70 layoutY:40;
text: bind (lat.toString());
columns: 8
editable: false;
}
def lblLng = Label {
layoutX:175 layoutY:45;
text: "Lng :"
}
def txtLongitude = TextBox {
layoutX:210 layoutY:40;
text: bind (lng.toString());
columns: 8
editable: false;
}

def btnUpdateMap = Button {
layoutX:320 layoutY:10;
text: "Get Latitude and Longitude"
action: function() {
  var addr:String = txtAddress.text;
  GMapGeoCoding.getLatLng(addr, setLatLng);
}
}

def lblLevel = Label {
layoutX:310 layoutY:45;
text: "Level :"
}

def sZoom:Slider = Slider {
layoutX:355 layoutY:45;
min: 1
max: 20
value:15
vertical: false
}

def stage = Stage {
title : "JavaFX Google Maps Demonstration"
scene: Scene {
  width: 500
  height: 400
  content: [
    lblAddress, txtAddress,
    lblLat, txtLatitude,
    lblLng, txtLongitude,
    btnUpdateMap,
    lblLevel,sZoom,
    mapview,
  ]
}
}
// GMapUtils.fx
package jfxgm;

import javafx.util.Math.*;

def GMAPOFFSET = 268435456;
def RADIUS = GMAPOFFSET / PI;
def GMAPMAXZOOM = 21;

function lng2x(lng):Integer {
  return round(GMAPOFFSET + RADIUS * lng * PI / 180);
}

function lat2y(lat) {
return round(GMAPOFFSET -
               RADIUS *
               log((1 + sin(lat * PI / 180)) /
               (1 - sin(lat * PI / 180))) / 2);
}

function x2Lng(x:Number):Number {
return ((round(x) - GMAPOFFSET) / RADIUS) * 180/ PI;
}

function y2Lat(y:Number) {
return (PI / 2 - 2 * atan(exp((round(y) - GMAPOFFSET) / RADIUS))) * 180 / PI;
}

public function adjustLngByPixels(lng:Number, delta:Number, zoom:Number):Number {
return x2Lng(lng2x(lng) + (delta * pow(2, (GMAPMAXZOOM - zoom))));
}

public function adjustLatByPixels(lat:Number, delta:Number, zoom:Number):Number {
return y2Lat(lat2y(lat) + (delta * pow(2, (GMAPMAXZOOM - zoom))));
}
// GMapGeoCoding.fx
package jfxgm;

import javafx.io.http.*;
import javafx.data.pull.PullParser;
import javafx.data.pull.Event;
import javafx.io.http.URLConverter;

public function getLatLng(address:String, setLatLng:function(lat:Number, lng:Number)):Void {
  def getRequest: HttpRequest = HttpRequest {
    var addr = URLConverter{}.encodeString(address);
    location: "http://maps.google.com/maps/geo?q={addr}&output=xml";
    onInput: function(is: java.io.InputStream) {
    def parser = PullParser {
      documentType: PullParser.XML;
      input: is;
      onEvent: function(event: Event) {
        if (event.type == PullParser.END_ELEMENT) {
          if (event.qname.name == "code" and event.text == "602") {
            setLatLng(0.0, 0.0);
          }
          else if (event.qname.name == "coordinates") {
            var pts = event.text.split(",");
            setLatLng(java.lang.Float.parseFloat(pts[1]),
                      java.lang.Float.parseFloat(pts[0]));
          }
        }
      }
    }
    parser.parse();
    parser.input.close();
  }
}
getRequest.start();
}


