Pages

Showing posts with label Tech. Show all posts

VBA Mail Merge RTF Email using Excel and Outlook

This article describes a solution on how to use Excel to send rich text format emails that are customized for their recipients.  Some of us may find it difficult to use VBA for Outlook to format rich text in the body of an email.  The approach taken here bypasses this difficulty by creating a draft rich text format email template using Outlook's user interface instead of creating it programmatically.

Let's start with an Excel spreadsheet which looks like the following figure.  There are three fields which will be used to customize each email.  Of course, the most important field is the email address itself which will be used to determine the recipient.


Next, we suppose that the following email template have been created and saved in the Drafts folder of Outlook.  The Subject: must be called "Template" because this is the string which the macro will lookfor.


Notice the placeholders {name} and {number}.  These placeholders will be replaced by the actual values drawn from each record in the spreadsheet illustrated earlier.

Here's the coding part.  Let start by defining a macro to load the email template from the Drafts folder in Outlook.  Basically, this macro iterates each item in the Drafts folder to find the template which is the one with its subject as "Template".  Line 11 is the trick to get the job done.  The formatted template is retrieved and is returned from this function hence eliminating the need to code the body of the email programmatically.

Private Function GetRichTextTemplate() As String

    Dim OLF As Outlook.MAPIFolder
    Dim olMailItem As Outlook.MailItem
    
    Set OLF = GetObject("", "Outlook.Application").GetNamespace("MAPI").GetDefaultFolder(olFolderDrafts)
    Set oItems = OLF.Items
    
    For Each Mailobject In oItems
        If Mailobject.subject = "Template" Then
            GetRichTextTemplate = Mailobject.HTMLBody
            Exit Function
        End If
    Next
 
End Function

Next, we need to define the macro SendMailMergeEmail to generate the customized emails and to send them out.  There are a few things this macro do.  First, it uses the GetRichTextTemplate macro to get the template from the Drafts folder.  Then for each record in the spreadsheet, it will retrieve the values and place them into the placeholders.  And then, it will put in the subject and the recipient before sending out the email.

Public Sub SendMailMergeEmail()
    Dim OLF As Outlook.MAPIFolder
    Dim olMailItem As Outlook.MailItem
    Dim olContact As Outlook.Recipient
    Set OLF = GetObject("", "Outlook.Application").GetNamespace("MAPI").GetDefaultFolder(olFolderInbox)
    
    Dim subject As String
    subject = " Latest Product Update"
    
    Dim body As String
    Dim template As String
    template = GetRichTextTemplate()
    
    Dim cnumber As String
    Dim cname As String
    Dim email As String
    
    Dim row As Integer
    row = 2

    cnumber = Sheets("Main").Range("A" & row)
    cname = Sheets("Main").Range("B" & row)
    email = Sheets("Main").Range("C" & row)
    While cnumber <> ""
        Set olMailItem = OLF.Items.Add
        With olMailItem
            Set olContact = .Recipients.Add(email)
            olContact.Resolve
            
            .subject = subject
            .BodyFormat = olFormatRichText

            body = Replace(template, "{name}", cname)
            body = Replace(body, "{number}", cnumber)
            .HTMLBody = body
            
            .Send    
        End With

        row = row + 1
        cnumber = Sheets("Main").Range("A" & row)
        cname = Sheets("Main").Range("B" & row)
        email = Sheets("Main").Range("C" & row)
    Wend
    
    Set olContact = Nothing
    Set olMailItem = Nothing
    Set OLF = Nothing
End Sub

One more thing.  For the codes above to run, the reference for Microsoft Outlook 14.0 Object Library has to be set.  If you are not using the latest Office 2010, you could select Microsoft Outlook Object 12.0 Library for Office 2007.


The above dialog box can be accessed from the Excel VBA Window under Tools...References.  After adding the reference, you are now ready to execute the macro SendMailMergeEmail to send customised rich text emails.  Here is a sample of the generated email that was sent.


You can see that the number, customer name and email have been mail-merged into the template.  By the way, you can find all sent emails in the Outlook's Sent Items folder.

The codes have been tested using Excel and Outlook 2010.  You can download the Excel File here.  Hope you have enjoyed this post and find the example useful.

Google Maps in China

This is my first post in this blog using Google Maps. Also to highlight in China, to be more precise in Beijing, there is a offset of 265 meters between the map and satellite views.


To see the actual difference, click on the Map view and the Satellite view.

Bubble, Selection & Insertion Sorts Demonstration

// Bubble Sort
for (int outer = a.length - 1; outer > 0; outer--) {
   for (int inner = 0; inner < outer; inner++) {
      if (a[inner] > a[inner + 1]) { 
         int temp = a[inner + 1];
         a[inner + 1] = a[inner];
         a[inner] = temp;
      }
   }
}
// Selection Sort
for (int outer = a.length - 1; outer > 0; outer--) {
   int max = outer;
   for (int inner = 0; inner < outer; inner++) {
      if (a[inner] > a[max]) {
         max = inner;
      }
   }
   int temp = a[outer];
   a[outer] = a[max];
   a[max] = temp;
}
// Insertion Sort
for (int outer = 1; outer < a.length; outer++) {
   int temp = a[outer];
   int inner = outer;
   while ((inner > 0) && a[inner - 1] > temp) {
      a[inner] = a[inner - 1];
      inner--;
   }
   a[inner] = temp;
}

JavaFX and Google Maps

Recently, I have taken a very keen interest in JavaFX. The declarative nature of the language and its powerful data binding capabilities, coupled with the fact that there are so many existing Java programs will accelerate its adoption very quickly.

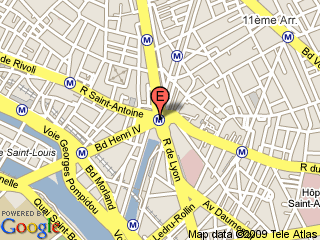
My exploration with JavaFX has been very fruitful. It is really easy to pick up and to be productive with it in a matter of hours. When I started to learn how Google Maps can be used with JavaFX, I found very little useful information in the Web. Googling the keywords "JavaFX Google Maps" was less than satisfactory. Then, I stumbled upon Google Maps can be used statically without Javascript. For example, the following map on Eiffel Tower is displayed using a static html link. Notice the latitude and longitude are specified in the URL.
http://maps.google.com/staticmap?center=48.8531,2.3691&markers=48.8531,2.3691,rede&zoom=14&size=320x240

Paris Eiffel Tower
It then dawned upon me how easy it is to incorporate Google Maps into JavaFX, all we need are the JavaFX Image and ImageView objects. For instance, the following codes will display the above map in a JavaFX application.
def stage = Stage {
title : "JavaFX Google Maps Demonstration"
scene: Scene {
 width: 500
 height: 400
 content: [
   ImageView {
     image: Image {
       url: "http://maps.google.com/staticmap?center=48.8531,2.3691&markers=48.8531,2.3691,rede&zoom=12&size=320x240"
     }
   }
 ]
}
}
Next, I discovered the use of Google Geocoding web service. Given an address, you can get the latitude and longitude of that address. For example, to find the latitude and longitude of New York USA, enter the following url.
http://maps.google.com/maps/geo?q=NEW+YORK+USA&output=xml
The Google Geocoding web service will return the following XML. Notice the latitude and longitude of New York, USA are returned in the coordinates element in line 25.

  
    NEW YORK USA
    
      200
      geocode


New York, NY, USA
US USA NY New York -73.9869510,40.7560540,0

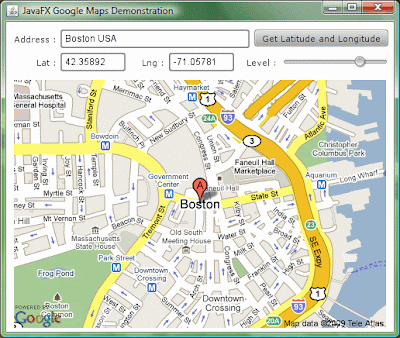
Hence, using static Google Maps and GeoCoding web service, I ventured to develop this demonstration application using the latest JavaFX 1.2. A screen shot of the application is given here.


This simple application allows the user to enter an address. If Google recognises it, the map of the address will be shown. The user can also pan the map by dragging the mouse or zoom in and out of the map using the slider. The application comprises three files Main.fx, GMapUtils.fx and GmapGeoCoding.fx.

Click on the Launch button to try the application.


The full source codes of these three files are given as follows.
// Main.fx
package jfxgm;

import javafx.stage.Stage;
import javafx.scene.Scene;
import javafx.scene.Cursor;
import javafx.scene.image.ImageView;
import javafx.scene.image.Image;
import javafx.scene.input.MouseEvent;
import javafx.scene.control.TextBox;
import javafx.scene.control.Label;
import javafx.scene.control.Button;
import javafx.scene.control.Slider;

var lng:Number = 103.8476410;
var lat:Number = 1.3717300;
var zoom:Integer = bind javafx.util.Math.round(sZoom.value);

bound function getMapImage(lt, lg, zm):Image {
  var mapurl:String = "http://maps.google.com/staticmap?center={lt},{lg}&markers={lt},{lg},reda&zoom={zm}&size=480x320";
  var map:Image = Image {
    url: mapurl;
  }
return map;
}

function setLatLng(lt:Number, lg:Number):Void {
  lat = lt;
  lng = lg;
}

var mapview:ImageView = ImageView {
  layoutX:10 layoutY:75;
  image: bind getMapImage(lat, lng, zoom);
  cursor : Cursor.MOVE;
  var anchorx:Number;
  var anchory:Number;
  onMousePressed: function( e: MouseEvent ):Void {
    anchorx = e.x;
    anchory = e.y;
  }
  onMouseReleased: function( e: MouseEvent ):Void {
    var diffx = anchorx - e.x;
    var diffy = anchory - e.y;
    lat = GMapUtils.adjustLatByPixels(lat, diffy, zoom);
    lng = GMapUtils.adjustLngByPixels(lng, diffx, zoom);
  }
}

def lblAddress = Label {
  layoutX:10 layoutY:15;
  text: "Address :"
}

def txtAddress = TextBox {
  layoutX:70 layoutY:10;
  text: ""
  columns: 28
  selectOnFocus: true
}

def lblLat = Label {
layoutX:39 layoutY:45;
text: "Lat :"
}
def txtLatitude = TextBox {
layoutX:70 layoutY:40;
text: bind (lat.toString());
columns: 8
editable: false;
}
def lblLng = Label {
layoutX:175 layoutY:45;
text: "Lng :"
}
def txtLongitude = TextBox {
layoutX:210 layoutY:40;
text: bind (lng.toString());
columns: 8
editable: false;
}

def btnUpdateMap = Button {
layoutX:320 layoutY:10;
text: "Get Latitude and Longitude"
action: function() {
  var addr:String = txtAddress.text;
  GMapGeoCoding.getLatLng(addr, setLatLng);
}
}

def lblLevel = Label {
layoutX:310 layoutY:45;
text: "Level :"
}

def sZoom:Slider = Slider {
layoutX:355 layoutY:45;
min: 1
max: 20
value:15
vertical: false
}

def stage = Stage {
title : "JavaFX Google Maps Demonstration"
scene: Scene {
  width: 500
  height: 400
  content: [
    lblAddress, txtAddress,
    lblLat, txtLatitude,
    lblLng, txtLongitude,
    btnUpdateMap,
    lblLevel,sZoom,
    mapview,
  ]
}
}
// GMapUtils.fx
package jfxgm;

import javafx.util.Math.*;

def GMAPOFFSET = 268435456;
def RADIUS = GMAPOFFSET / PI;
def GMAPMAXZOOM = 21;

function lng2x(lng):Integer {
  return round(GMAPOFFSET + RADIUS * lng * PI / 180);      
}

function lat2y(lat) {
return round(GMAPOFFSET -
               RADIUS *
               log((1 + sin(lat * PI / 180)) /
               (1 - sin(lat * PI / 180))) / 2);
}

function x2Lng(x:Number):Number {
return ((round(x) - GMAPOFFSET) / RADIUS) * 180/ PI;
}

function y2Lat(y:Number) {
return (PI / 2 - 2 * atan(exp((round(y) - GMAPOFFSET) / RADIUS))) * 180 / PI;
}

public function adjustLngByPixels(lng:Number, delta:Number, zoom:Number):Number {
return x2Lng(lng2x(lng) + (delta * pow(2, (GMAPMAXZOOM - zoom))));
}

public function adjustLatByPixels(lat:Number, delta:Number, zoom:Number):Number {
return y2Lat(lat2y(lat) + (delta * pow(2, (GMAPMAXZOOM - zoom))));
}
// GMapGeoCoding.fx
package jfxgm;

import javafx.io.http.*;
import javafx.data.pull.PullParser;
import javafx.data.pull.Event;
import javafx.io.http.URLConverter;

public function getLatLng(address:String, setLatLng:function(lat:Number, lng:Number)):Void {
  def getRequest: HttpRequest = HttpRequest {
    var addr = URLConverter{}.encodeString(address);
    location: "http://maps.google.com/maps/geo?q={addr}&output=xml";
    onInput: function(is: java.io.InputStream) {
    def parser = PullParser {
      documentType: PullParser.XML;
      input: is;
      onEvent: function(event: Event) {
        if (event.type == PullParser.END_ELEMENT) {
          if (event.qname.name == "code" and event.text == "602") {
            setLatLng(0.0, 0.0);
          }
          else if (event.qname.name == "coordinates") {
            var pts = event.text.split(",");
            setLatLng(java.lang.Float.parseFloat(pts[1]),
                      java.lang.Float.parseFloat(pts[0]));
          }
        }
      }
    }
    parser.parse();
    parser.input.close();
  }
}
getRequest.start();
}

Java Compile and Run in Notepad++

Notepad++ is an excellent text editor. It supports syntax highlighting of many programming languages besides Java. Unlike Eclipse and Netbeans, it is light-weight and it can be launched from Windows Explorer easily by right-clicking on the file you wish to edit.

The following steps describe how you can extend the capabilities of Notepad++ to include compiling and executing Java programs from Notepad++ itself.

First, create a file called JavaCompileRun.bat. You can do this by right-clicking on your Windows' Desktop and then click New and Text Document. Then, key in "JavaCompileRun.bat" as the new file name. Right-click on this file and click Edit. Put in the following codes and save the file.
cd /d "%1"
javac %2
if errorlevel 1 goto finish
java %3
:finish
pause
Next, copy the file JavaCompileRun.bat to your Notepad++ program folder, usually at C:\Program Files\Notepad++.

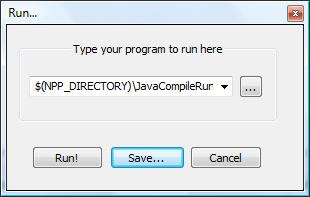
Open Notepad++. Select the Run menu and click on Run.... A dialog box will appears. Key in the following command.
$(NPP_DIRECTORY)\JavaCompileRun.bat "$(CURRENT_DIRECTORY)" "$(FILE_NAME)" "$(NAME_PART)"
After keying in the above command, the dialog box should look something like this...


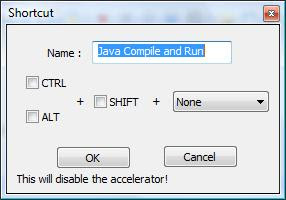
Click on the Save... button. In the Name: text box, key in "Java Compile and Save" as shown in the figure below.


Click OK and then click on the Run! button. Your Java program should compile and run if there is no error.

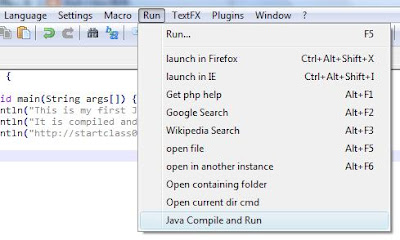
Now to compile the current Java program, make sure you have saved the file. Then, in the Run menu, click Java Compile and Run as shown.


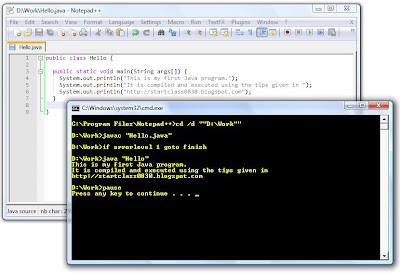
A Command Prompt window will appear and the results of your Java program will be displayed.


There is however one serious limitation with this method. Only Java programs with default package will compile and run.

Changing Template in Blogger

I had been a casual blogger until of late when I am seriously exploring how Blogger works. One of the things which I sought to do was to change the template to something more professional. I have tried many templates without success. The cryptic errors reported by Blogger on various occasions were bX-si9ejx, bX-aoj9qb, bX-hq2u5m and etc.

Many other bloggers also experienced these problems and the solution commonly suggested was to delete all browser cookies and temporary files, and then upload the template again. This solution didn't work for me. I also tried changing browsers from FireFox to IE to Chrome and even Opera.

After many hours of research and experimentation, I've finally understood the problem. I came to the understanding that the template not only defines the skin and the layout of the blog, it also stores information about the widgets which I've created. The definition for each created widget is stored in this template. And along with this definition, Blogger also automatically assigns an id with each created widget. By the way, for the uninitiated, widgets are page elements which make up a blog. These are your blog archives, labels, feeds, links and etc. Basically, they are different sections of your blog.

For each template downloaded from popular sites such as Our BLOGGER Template, the template also consists of pre-defined widgets . As mentioned above, each widget is defined by its id. Most of the time unfortunately, the ids of these widgets clash with your existing widgets. In another words, they have the same name. This is where the problem lies!

To overcome this problem, before you upload the template, you should resolve these name conflicts. Common names of widgets are blog1, feed1, label1, etc. You probably need to rename all these other names, (such as blog111, feed111 and label111 etc) in order to avoid the problem altogether.

Take for example the Professional Template downloaded from http://www.ourblogtemplates.com/2008/11/blogger-template-professional-template.html.
These are the lines in the template which should be changed. You can open this file using WordPad and search for "widget id". You need not rename every instance. Only those instances that have name conflicts with your existing widgets need to be renamed. But for simplicity, just rename every widget id.
<b:widget id='Header1' locked='true' title='The Professional Template (Header)' type='Header'>
<b:widget id='Blog1' locked='true' title='Blog Posts' type='Blog'>
<b:widget id='Profile1' locked='false' title='About Me' type='Profile'>
<b:widget id='Label2' locked='false' title='Labels' type='Label'>
<b:widget id='Image1' locked='false' title='' type='Image'>
<b:widget id='Text2' locked='false' title='About This Blog' type='Text'>
<b:widget id='Text3' locked='false' title='Lorem Ipsum' type='Text'>
<b:widget id='Text4' locked='false' title='Lorem Ipsum' type='Text'>
<b:widget id='Text5' locked='false' title='Lorem' type='Text'>
<b:widget id='LinkList1' locked='true' title='Linkbar' type='LinkList'>
<b:widget id='LinkList2' locked='false' title='Links' type='LinkList'>
<b:widget id='BlogArchive1' locked='false' title='Blog Archive' type='BlogArchive'>
<b:widget id='Feed1' locked='false' title='Our Blogger Templates' type='Feed'>
The following lines show the renamed ids. E.g. Header1 → Header111.
<b:widget id='Header111' locked='true' title='The Professional Template (Header)' type='Header'>
<b:widget id='Blog111' locked='true' title='Blog Posts' type='Blog'>
<b:widget id='Profile111' locked='false' title='About Me' type='Profile'>
<b:widget id='Label222' locked='false' title='Labels' type='Label'>
<b:widget id='Image111' locked='false' title='' type='Image'>
<b:widget id='Text222' locked='false' title='About This Blog' type='Text'>
<b:widget id='Text333' locked='false' title='Lorem Ipsum' type='Text'>
<b:widget id='Text444' locked='false' title='Lorem Ipsum' type='Text'>
<b:widget id='Text555' locked='false' title='Lorem' type='Text'>
<b:widget id='LinkList111' locked='true' title='Linkbar' type='LinkList'>
<b:widget id='LinkList222' locked='false' title='Links' type='LinkList'>
<b:widget id='BlogArchive111' locked='false' title='Blog Archive' type='BlogArchive'>
<b:widget id='Feed111' locked='false' title='Our Blogger Templates' type='Feed'>
Have a productive time changing your blogger templates!

Setting Default Folder in Windows Explorer

When Windows Explorer is started, the Documents folder of the current user will be selected. Suppose you want it to select another folder, say the Work folder in D:, can this be done easily? Yes!

Right click on the Windows Explorer icon and click Properties. In the Target textbox, you will see "%SystemRoot%\explorer.exe". Replace this with
%SystemRoot%\explorer.exe /n, /e, /select, D:\Work

The above tip works for Windows XP, Vista and Seven.

Resequencing Photos from more than one Camera

This is a python script which I have written to resequence photos taken from two cameras. The script makes use of the date and time of the photos to sequence the filenames.

import os, glob, time

fprefix = "Beijing"        # Name to prefix photos
folder  = "D:/Beijing2008" # Folder to look for photos
ext     = "jpg"            # Extension of photos
sno     = 1                # Serial number to start

print "Folder = ", folder
print '-' * 60
date_file_list = []
for file in glob.glob(folder + "/*." + ext):
  stats = os.stat(file)
  lastmod_date = time.localtime(stats[8])
  date_file_tuple = lastmod_date, file
  date_file_list.append(date_file_tuple)
  #print date_file_list  # test

date_file_list.sort()
#date_file_list.reverse()  # newest mod date now first

import string
print "%-40s %s" % ("filename:", "last modified:")
for file in date_file_list:
  folder, file_name = os.path.split(file[1])

  # Rename File
  ext = os.path.splitext(file_name)
  file_name = fprefix + ("%03d" % sno) + string.lower(ext[1])
  sno = sno + 1
  newfile = folder + "/" + file_name

  os.rename(file[1], newfile)

  # convert date tuple to MM/DD/YYYY HH:MM:SS format
  file_date = time.strftime("%m/%d/%y %H:%M:%S", file[0])
  print "%-40s %-20s %s" % (folder, file_name, file_date)

Vista and Command Prompt Here

Those of us who were using Windows XP and Microsoft PowerToys Command Prompt Here would miss this feature in Windows Vista. You will find that there is no equivalent of such a utility by Microsoft for Vista. This is so because of an obvious reason. Vista has already this feature built-in.

Open up Windows Explorer, hold the [Shift] key down, right-click on any folder on the details pane on the right, you will see "Open Command Window Here" menu item third in the pop-up menu. However, if you do this on the folder pane on the left of the Windows Explorer, this will not work. Disappointed?

Another way is to modify Vista's registry. Here is how this can be done. Navigate in your Registry to HKEY_LOCAL_MACHINE/Software/Classes/Folder/Shell and create a key called Open Command Prompt Here. Set the default string to whatever text you want to appear in the right-click menu. Create a new key within your newly created command prompt named "command," and set the default string to cmd.exe /k pushd %L. You may need to add %SystemRoot%\system32\ before the cmd.exe if the executable can't be found.

The changes should take place immediately. Right click a folder in both the right and left panes of your Windows Explorer and your new menu item should appear.

Python and .NET

I was asked to explore using Python with .NET. Here are three possibilities.

Configuration A – Plain IronPython
This is the most straightforward and plain vanilla installation.
Download IronPython-1.1.1-Bin.zip (975KB) from http://www.codeplex.com/IronPython.
Unzip the files into a folder, say C:\IronPython-1.1.1 and set the PATH. Voila!
Type ipy helloworld.py or ipyw helloworld.py

Configuration B – IronPython Studio
IronPython Studio is based on the Visual Studio 2008 Shell runtime (royalty free) and can be installed without requiring any version of Visual Studio. It provides the following templates for projects using IronPython.

Need to first install Visual Studio 2008 Shell (Isolated) (390MB) from http://www.microsoft.com/downloads/details.aspx?familyid=aca38719-f449-4937-9bac-45a9f8a73822&displaylang=en. Make sure you execute the vs_shell_isolated.enu.exe file in C:\VS 2008 Shell Redist\Isolated Mode. If you missed this step, the Iron Python Studio will not work.
Download IronPythonStudio.msi (1127KB) from http://www.codeplex.com/IronPythonStudio. Double click on the above msi file and the installation will start. IronPython is also included in the msi.

Configuration C – Visual Studio 2008 with IronPython
For those who already have VS2008 installed and are working in VS2008 for VB and C# projects, this would be the best configuration. Download Visual Studio 2008 SDK (98MB) from http://www.microsoft.com/downloads/details.aspx?familyid=30402623-93ca-479a-867c-04dc45164f5b&displaylang=en and install it on top of Visual Studio 2008. Run VS2008 under “Visual Studio 2008 SDK --> Tools --> Start Visual Studio 2008 Under Experimental Hive”. On top of VB, C#, C++ and all the project types in IronPython Studio, it also allows ASP.NET web applications and services to be developed using IronPython!


It is difficult to develop GUI Applications without IDE. Since I am a DOTNET guy, I go with Configuration C. Configuration B would be good for those of us who are not using VB and C#. Configuration A in my opinion is not productive, but nonetheless a very convenient way to pick up the basics of Python in .NET.

After some hours of experimentation, there are some serious bugs in IronPython. My colleague reported this problem, create a Button and define a button_click event for the button. However, when a new Label is created, the button_click function is overwritten. Any change made directly to the codes in the code view will most likely mess up the designer view. The Designer View can also be easily "corrupted" even with incorrect indentation.